First Angle Projection & Third Angle Projection Symbol (Orthographic Projection)
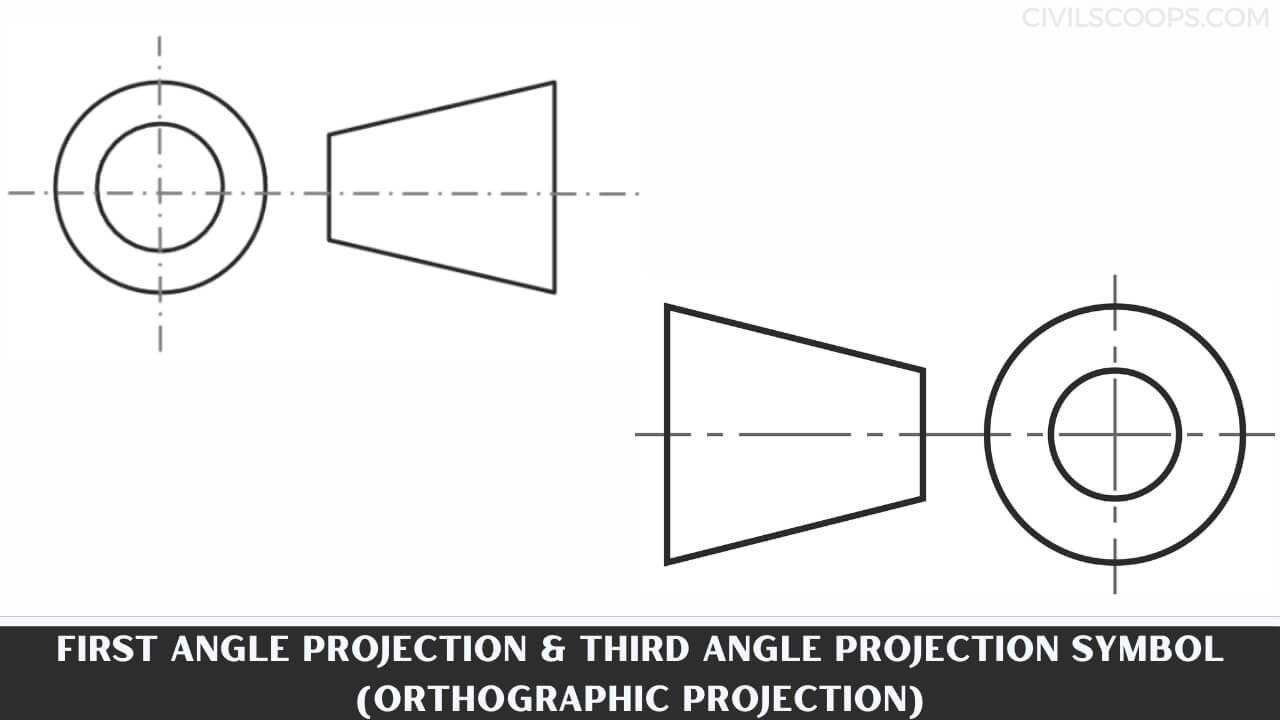
Table of Contents
What Is Orthographic Projection?
Orthographic views consist of one, two, or more separate aspects of an object taken from different directions & different sizes, generally at right angles to each other and arranged in a definite manner.
These views collectively describe the object. Orthographic views of any purpose can be represented by any one of the two systems of projection
The first angle projection and the third angle projection. It is named according to the quadrant in this which the object is imagined no place for purposes of line projection.
As far as any shape and size of the views are concerned, there is no difference between these two systems. The only difference lies in the relative positions of the various views. Indian Standards Institution recommends
(IS: 696-1972) both these systems leaving the choice to the discretion of the organization concerned. However, there are specific merits and demerits associated with each system. Students are advised to study both the methods to meet the varying demands of different industries in the country.
To meet this end. Some chapters in this book are exclusively dealt with in the first angle projection, and some in the third-angle projection.
Also Read: Civil Engineering Basic Knowledge
Types of Orthographic Projection
Orthographic projection two different parts and also a different type of symbol as per below detail mention.
- First angle projection & First angle projection symbol
- Third angle projection & Third angle projection symbol
First angle projection & First angle projection symbol
In this, the object is imagined to be in the first quadrant. Because the observer normally looks from the right side of the quadrant to obtain the front view. The objects will come in between the observer and the plane of projection.
Therefore, in this case, the object is to be transparent, and the projectors are imagined ta be extended from various points of the object to meet the projection plane. First, these meeting points when joined in the order form an image
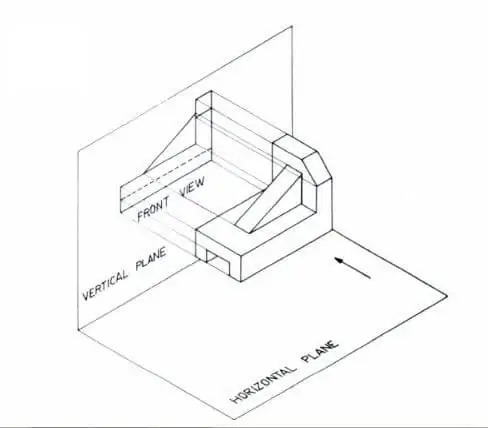
Principle first angle projection view
This is the principle of the first angle projection. Thus in the first angle projection, any view is so placed that it represents the side of the object away from it.
First angle projection is mesurly used throughout all parts of Europe so that called European projection.
Most important of First angle projection symbol
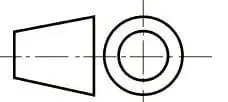
First angle projection symbol
Also Read: Difference Between Heartwood and Sapwood | What Is Sapwood | What Is Heartwood
Third angle projection & Third angle projection symbol
In this, the object is imagined to be placed in the third quadrant. Again, as the observer is normally supposed to look from the right side of the quadrant to obtain the front view, in this method, the projection plane comes in between the observer and the object.
Therefore, the plane of projection has to be assumed to be transparent. The intersection of this plan with the projectors from all the points of the object would form an image on the transparent plane.
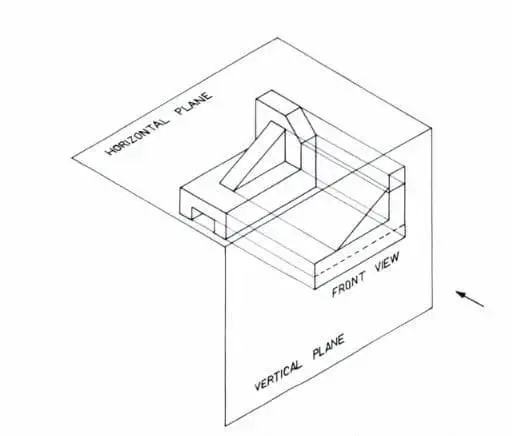
Thus it is seen that in the third angle projection any view is so placed that it represents the side from the object nearest to it
Most important of Third angle Projection symbol
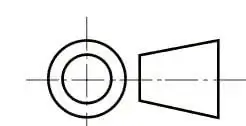
Third angle Projection symbol
The third angle is the system in used North America and alternatively described as American projection.
Making Orthographic Views
- Front view
- Side view
- Top View
- Presentation of view
1. Front View
To draw the front view of an object in the first angle projection, the object which is assumed to be transparent is imagined to be in front of the vertical plane (first quadrant) as shown in.

Front View Detail Drawing No 1
The shape of the object, when viewing from the front. Is obtained by joining in order all the meeting points of the projectors extended from the visible edges of the object. This is called a front view.
A similar treatment is repeated for the front view in the third angle projection, but with a transparent vertical plane imagined to be held in front of the object.
Here the shape of the object when viewed from the front is obtained by joining in order all the intersection points on the transparent plane of the projectors to the visible edges of the object

Front View Detail Drawing No 2
Also Read: Difference Between Mat Foundation and Spread Footing | What Is Mat Footing | What Is Spread Footing
2. Side View
The shape of some objects cannot be interpreted completely from the from and top views only. In such cases, more information may be needed, and for this purpose, a third plane is imagined.
This is called an auxiliary vertical plane and is placed perpendicular to the first two planes. A view can be obtained on to this plane in a way similar to that explained above. In the first angle method, if the auxiliary vertical plane is the place to the right of the object, a view is obtained on it by looking at the object from its left side.
It is then called a left side view. On the other hand, if the auxiliary vertical plane is placed to the left of the
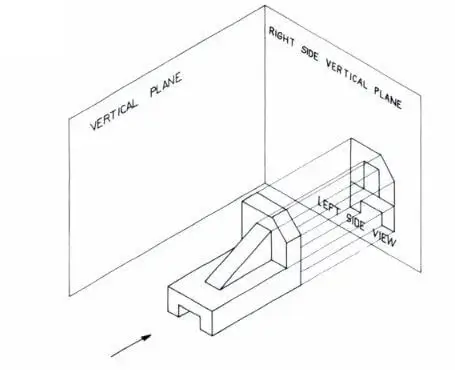
Side View Detail Drawing
3. Top View
The projection on to a plane placed horizontally below the transparent object will reveal the shape of the object as viewed from below.
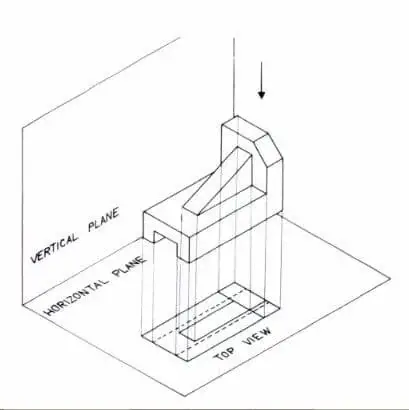
Top View Drawing No 1
This view is called a top view, and the principle that is being followed is that of the first angle projection. Figure deals with a similar treatment in the third angle projection with a transparent plane placed horizontally below the object.
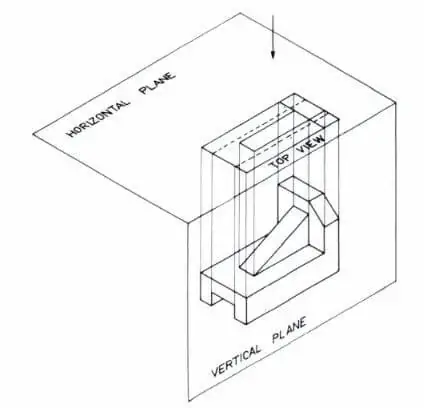
Top View Drawing No 2
Also Read: 11 Difference Between Silt and Clay
4. Presentation of view
For presenting the views on a drawing sheet, irrespective of the method of projection, the horizontal plane, and the auxiliary vertical plane arc rotated till they come in the plane with the original vertical plane.
Now the three views of the object will be in the same plane, viz., the plane of the paper. These three views normally provide enough information to describe the shape and size of the object.
Above drawing shows the relative positions of the views in the first angle projection and below drawing n the third angle projection. The method used for the projection is indicated by a distinctive symbol (presentation of view drawing No 1 .C and Presentation of view drawing No 2 C)
[su_box title=”FAQ” style=”default” box_color=”#333333″ title_color=”#FFFFFF” radius=”3″ class=”” id=””]
Third Angle Projection
3rd Angle project is where the 3D object is seen to be in the 3rd quadrant. It is positioned below and behind the viewing planes, the planes are transparent, and each view is pulled onto the plane closest to it. The front plane of projection is seen to be between the observer and the object.
Third Angle Projection Symbol Meaning
The projection symbol used to represent third angle projection shows what you would see when looking at the cone from the left, drawn sitting to the left of the drawing of the front face of the cone. Third angle projection symbol. AS 1100 recommends the use of third angle projection.
Orthographic Projection Angle
Orthographic projection uses multiple views of an object, from points of view rotated about the objects centre through increments of 90 degrees. In first angle projection, each view of the object is projected in the direction (sense) of sight of the object.
Third Angle Projection Vs First
In the third-angle projection, the view of a component is drawn next to where the view was taken. In first-angle projection, the view is drawn on the other end of the component, at the opposite end from where the view was taken.
First Angle Projection
In the first angle projection, the object is placed in the 1st quadrant. The object is positioned at the front of a vertical plane and top of the horizontal plane. First angle projection is widely used in India and European countries.
3rd Angle Projection
3rd Angle project is where the 3D object is seen to be in the 3rd quadrant. It is positioned below and behind the viewing planes, the planes are transparent, and each view is pulled onto the plane closest to it. The front plane of the projection is seen to be between the observer and the object.
1st Angle Projection
In the first angle projection, the object is placed in the 1st quadrant. The object is positioned at the front of a vertical plane and top of the horizontal plane. First angle projection is widely used in India and European countries. The object is placed between the observer and projection planes.
Difference Between First Angle and Third Angle Projection
In the third-angle projection, the view of a component is drawn next to where the view was taken. In first-angle projection, the view is drawn on the other end of the component, at the opposite end from where the view was taken.
First Angle Projection and Third Angle Projection
In the third-angle projection, the view of a component is drawn next to where the view was taken. In first-angle projection, the view is drawn on the other end of the component, at the opposite end from where the view was taken.
Define First Angle Projection
What is a First Angle Projection? The First Angle Projection schema imagines the object in the first quadrant. One can place an object on the top of the horizontal plane and at the front of the vertical plane. The first angle projection is utilized mostly in India and various European countries.
Difference Between For And While Loop: Differ
GATE Score Validity: Difference Between SSD
[/su_box]
[su_note note_color=”#F2F2F2 ” text_color=”#333333″ radius=”3″ class=”” id=””]
Like this post? Share it with your friends!
Suggested Read –
- 15 Different Types of Cement and Their Uses
- What Are the Components of Stairs | 19 Different Types of Stairs Components
- What Is Sealing Brick Work| Advantages of Brick Sealer | Types of Brick Sealer
- 10 Different Between Mortar And Concrete | What Is Mortar & Concrete | Types of Mortar & Concrete
- Types of Bearing Capacity Failures of Foundation | Bearing Capacity Definitions | Theory of Terzaghi’s Bearing Capacity
[/su_note]
